

Posted by Spartan Equipment on 3rd Nov 2026
The most common mistake we see on job sites, whether it’s a high-end utility project or a backyard drainage install, is the "lazy swap." Most operators keep the same bucket on the coupler for three days straight because jumping out of the cab to pull pins or mess with a hydraulic quick-attach feels like a hassle. But that laziness is costing you money.
Every hour you spend trying to scrape a flat bottom with a toothed bucket, or trying to pry through hardpan with a grading bucket, is an hour of wasted fuel, unnecessary machine wear, and lost billable time.
If you want to move dirt efficiently with a mini excavator, you have to treat your attachments like a set of professional tools. You wouldn't use a framing hammer to drive finishing nails, so why would you use a standard digger bucket for final grading?
The Three Main Bucket Categories
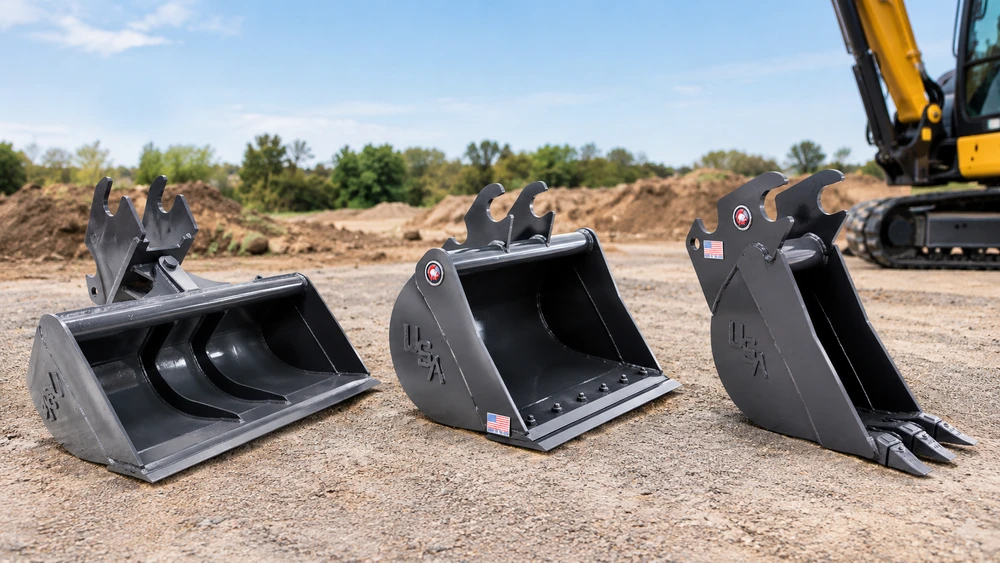
When you’re running a mini excavator, your bucket choice usually dictates how your entire day goes. There are three categories you need to master.
1. Excavator Digging Buckets (The Tooth Bucket)
This is the workhorse of the fleet. You know it when you see it: the deep, aggressive curve and the row of teeth staring back at you. These are engineered specifically for primary earthmoving. The curved profile isn’t just for looks; it’s designed to maximize the "breakout force" of your machine. When you curl the bucket, that geometry creates a natural leverage point that forces the teeth into compacted soil or clay.
At Spartan Equipment, we build these for the 6,0006,000 to 18,000 lb18,000 lb weight classes because that’s the "sweet spot" for mini excavators. If you’re running a 10,000 lb machine, you need a bucket that’s heavy enough to stand up to the hydraulic torque but not so heavy that it kills your lift capacity. If your bucket is oversized, you’re losing 500 lbs of payload before you even start. Always look for reinforced side cutters. When you’re cutting a trench, the side plates take a massive beating from friction. Without proper reinforcement, you’re just thinning out the steel until it eventually cracks.
2. Grading Buckets (The Cleaning/Ditching Bucket)
Once the heavy digging is done, the tooth bucket needs to go back on the trailer. This is where the grading bucket comes into play. These feature a square, flat bottom and, usually, no teeth. Why no teeth? Because teeth are designed to disrupt. A grading bucket is designed to smooth. If you try to back-drag with a toothed bucket, you’re just leaving grooves in the dirt that you’ll have to rake out by hand.
We always recommend running a bolt-on cutting edge on these. It acts as a sacrificial layer. When the edge gets rounded off from years of scraping on concrete or rocky soil, you just unbolt it and put on a new one. It’s significantly cheaper than replacing the entire bucket shell because you wore the factory edge down to the pins.
3. Hydraulic Tilt Buckets: The Pro Upgrade
If you do a lot of drainage or complex landscaping, a standard grading bucket is just the entry point. The real game-changer is the Hydraulic Tilt Bucket. Imagine having to square up your excavator perfectly perpendicular to a slope just to dig a ditch. It’s a pain, it takes forever, and you usually end up tearing up the lawn with your tracks just trying to position the machine correctly.
With a tilt bucket, you can angle the bucket 45∘45∘ to the left or right while the excavator stays on solid ground. This is the difference between a two-hour job and a twenty-minute job. You can carve out drainage swales, prep banks for erosion control, or grade around building foundations without having to reposition the machine. Yes, the initial investment is higher, but the ROI shows up in the sheer number of jobs you can knock out in a single week.
How to Select the Right Size
Choosing the correct bucket width is a balancing act between volume and machine capability.
- Width Strategy: Narrower buckets (12"–18") are surgical tools. They are ideal for specific utility trenching where you want to minimize the amount of spoil you have to move. Every cubic foot of dirt you dig is a cubic foot you have to backfill, pack, and potentially haul away. Wider buckets (up to 42"+) are great for moving large volumes of loose material, but they require much higher breakout force.
- The Capacity Trap: Always match the bucket capacity to your excavator's rated lift specs. If you try to run a bucket that’s too wide or too heavy for your machine’s weight class, you’ll experience "cycle-time lag." You’ll notice the hydraulics feel sluggish, and your rear end will feel light. If the machine feels "tippy," stop immediately and downsize the bucket. You’re over-extending your reach and putting unnecessary strain on your hydraulic pumps.
Mistakes That Eat Up Your Profits
- Over-digging: Using a massive digging bucket for a simple 6-inch cable trench is a rookie mistake. You end up with a massive pile of spoil that takes twice as long to backfill. Use a narrow bucket; keep the trench tight.
- Forcing the Wrong Tool: Using a grading bucket to "pry" through hardpan or rocky ground will ruin your edge faster than anything else. You’ll bend the flat bottom, and once that steel is warped, it’ll never grade a smooth surface again. Save the pry-work for your toothed bucket.
- Ignoring Wear and Tear: A dull tooth setup burns more fuel. You’re essentially pushing the machine harder just to get the teeth to bite. Keep a spare set of teeth in your truck. Replacing a set is a fifteen-minute job that saves you from damaging your bucket’s shank or the machine's hydraulic system.
Summary: Matching the Job to the Attachment
|
Task |
Recommended Attachment |
|
Breaking virgin ground |
Excavator Digging Bucket (Tooth) |
|
Digging narrow utility trenches |
|
|
Final leveling & site cleanup |
|
|
Sloping & precision drainage |
Why Spartan Equipment is the Industry Standard for Excavator Attachments
At Spartan Equipment, we don’t believe in "light-duty" attachments. If you’re running a mini excavator in the field, you’re dealing with the same reality we do: equipment that gets beat up, pushed to the limit, and expected to perform under pressure. We’ve spent years refining our attachment designs to meet the demands of real-world operators who need gear that lasts for years, not just a few projects.
Our philosophy is built on three core pillars:
- Precision Engineering: We don't just weld steel; we engineer for performance. Every digging and grading bucket we produce is designed to match the specific hydraulic breakout force of the 6,0006,000–18,000 lb18,000 lb weight classes. This means less "bucket flop," better cycle times, and a tighter connection to your quick-attach system.
- High-Grade Materials: Reinforced, high-tensile steel is used in the weakest points, such as the side cutters, floor plates and hinge points. These are the areas where affordable mounts let the users down and result in downtime and costly on-site repairs. Overbuilding the points of contact helps your machine spend more time moving dirt and less time in the shop repairing welds.
- Direct-to-Operator Value: By focusing on the specific needs of the professional contractor, we’ve stripped away the fluff. We provide attachments that fit, work, and hold up under the daily abuse of a construction site. When you buy from Spartan, you aren't paying for fancy decals; you’re paying for the steel, the craftsmanship, and the peace of mind that comes with knowing your equipment isn't going to let you down when the deadline is tomorrow.
Whether you are looking to outfit a brand-new machine or replace an attachment that finally met its match in a rocky job site, our gear is built to take the hit. We know what it’s like to be behind the controls, and we build our buckets to make that job easier, faster, and more profitable. Check out our full lineup of mini excavator attachments and see the difference that professional-grade steel makes.
Frequently Asked Questions
What makes a Spartan Equipment bucket different?
We build for high-cycle, professional environments. Our buckets use higher-grade steel in the high-stress areas like the ears, the pivot points, and the base plate. By matching our buckets to specific weight classes (6k–18k lbs6k–18k lbs), we ensure the center of gravity and the breakout leverage remain optimal for your specific machine.
Can I get away with using a digging bucket for final grading?
Technically, yes, but you’re setting yourself up for a headache. The teeth will leave "trench lines" in your finish, and the curved bottom will make it impossible to get a perfectly flat grade. If you’re getting paid for the finish quality, you need a grading bucket.
When does a tilt bucket pay for itself?
If you're doing more than two drainage or landscaping jobs a month, the tilt bucket pays for itself in operator time saved. It eliminates the need for constant track movement, which reduces ground disturbance on finished lawns and saves your undercarriage from unnecessary wear.
Does bucket width really impact machine stability?
Absolutely. Even if your excavator can lift the bucket, a wide bucket changes the leverage on your dipper arm. If the bucket is too wide, the added weight at the end of the reach will make the machine unstable on slopes. Always check the manufacturer's maximum bucket width recommendation for your specific machine weight.